

Pink wafer ice cream cake is such a fab and colourful no bake cake, it'll make a fantastic birthday surprise (but it's so easy to make!). There's nothing quite like a pretty ice cream cake and this one really is something special. It's really simple to make, but you will need to start it the day before so it has plenty of time to set in the freezer overnight. This means that on the day of the party, you can spend more time on other preparations rather than worrying about the cake. Whether you're planning a children's birthday party, or one for an adult, everyone will love this cake - it's so fun and you really can't go wrong with it!
Ingredients
- 2 litres strawberry ice cream
- 750ml vanilla ice cream
- 1x12g sachet gelatine
- 65ml whole milk
- 500ml double cream
- 1tsp vanilla extract
- A few drops pink food colouring
- 4tbsp icing sugar
- Confetti cake sprinkles
- 12 pink wafer biscuits
WEIGHT CONVERTER
Method
- Soften half the strawberry ice cream. Line a deep 18cm loose-based tin with clingfilm and spoon the ice cream into the base. Spread to the edges and smooth, then pop in the freezer.
- Soften the vanilla ice cream, spread in an even layer on top of the first layer then put back in the freezer. Soften the rest of the strawberry ice cream, spread in the tin to make the last layer. Leave in the freezer for 2 hrs or overnight. Chill the serving plate in the freezer.
- Turn the cake out of the tin straight onto the chilled serving plate. Remove the clingfilm, then return the cake to the freezer.
- Add the gelatine and milk to a small pan, mix and very gently heat until it dissolves. Allow to cool slightly, then add 3tbsp cream to the gelatine and mix. Pour the rest of the cream into a bowl along with the vanilla, food colouring and icing sugar, whisk until it starts to thicken, then pour in the gelatine mixture. Keep whisking until soft peaks form - don’t overmix or it’ll be too hard to spread - you can thin with a splash of milk if you need to.
- Using a palette knife, spread the covering all over the cake, then decorate the sides with the sprinkles and return to the freezer.
- Meanwhile, cut the ends of the wafers at an angle and set on top of the cake to decorate just before serving.
Top Tip for making Pink wafer ice cream cake
Decorate with pink wafers just before serving.
-
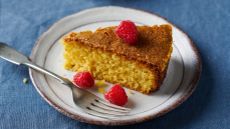 Orange polenta and olive oil cake
This orange polenta and olive oil cake has just a handful of ingredients and will taste even better if you can bake it a couple of days ahead.
-
 Cheese and pickle straws
This cheese and pickle straws takes a simple party staple and ramps it up a level by adding a twist of tangy pickle to the mix.
-
 Oreo cupcakes


-
 Sweet potato and courgette fish cakes
These sweet potato and courgette fish cakes take 30 minutes to make and can be served with chips, salad, or steamed veg on the side...
-
 Chicken and spinach lasagne
This chicken and spinach lasagne is a great new take on the family favourite and it’s easy to prepare during the day to cook come dinner time...
-
 Broccoli pasta with pancetta
This broccoli pasta with pancetta takes 30 minutes to cook making it a great speedy family dinner...


-
 You probably already have the ingredients to make a lava cake in your air fryer - here's how to whip up this easy dessert
You could have yourself a delicious homemade dessert in just 10 minutes with this air fryer lava cake hack.
-
 4 ingredients and 15 minutes to make this classic British dessert in your air fryer
You can make bread and butter pudding in an air fryer using just four basic store cupboard ingredients, thanks to one TikTok influencer's recipe.
-
 5 easy ways to let children take risks (without your anxiety going through the roof)
Here's why allowing children to put themselves in 'healthy' risk situations is actually good for them


