Paddington Bear-inspired cupcakes

Put a big smile on your child's face with these Paddington Bear-inspired cupcakes. They're much easier to make than you may think! Victoria Threader's step by step recipe shows you how to make your own...
Tip: These toppers will need overnight to dry so make sure you give yourself plenty of time before you need them.
Ingredients
- 1x batch of basic cupcakes
- 1x batch of buttercream icing
- 50g red modelling paste
- 40g blue modelling paste
- 110g white modelling paste
- 5g black fondant
- 35g chocolate fondant
Step 1

To make the brown modelling paste, mix the white modelling paste with the chocolate fondant. Leave 10g chocolate fondant to one side. Mix 20g chocolate fondant with 20g white modelling paste for the faces. Then mix 5g chocolate fondant with 20g white modelling paste for the buttons.
Victoria used Sugarflair’s Christmas red food colour pastes for the hat and ice blue and navy mixed for the duffle coat.

Step 2

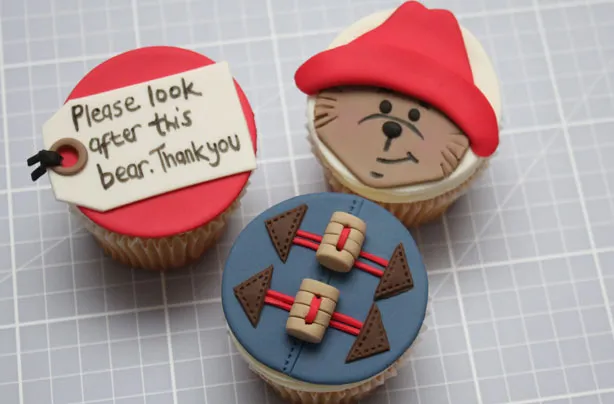
You’ll need 4x red and 4x white 68mm circles to hold Paddington’s face and the labels. Roll the paste out to 2mm thick and make them using the 68mm cutter, then leave to dry on a drying sponge or greaseproof paper.
Step 3

To make the faces, roll out the medium brown paste and cut 4x 48mm circles. Use small scissors to cut the fur at the side edge of the circles.
Step 4

Add the eyes and nose by rolling tiny balls of black fondant. Use the black edible food colour pen to draw the features.
To give Paddington a chin, trim the bottom edge to a point and smooth with the edge of your finger.
Step 5

To make the hat, cut a triangle with rounded edges and cut a dip in the top. Then fold the bottom edge up to give you the hat rim.
Step 6

With a brush of water, stick the face to the white discs first, then add the hat.
Step 7

To make the duffle coats, cut 4x blue 68mm circles. Make a mark down the centre with a sharp knife without going all the way through the fondant. Then use the stitch tool to mark the stitching.
Step 8

Using the remainder of the red paste, roll and cut tiny strands for the coat catches and stick them across the front of the coat with a brush of water.
Step 9

For the leather pads, roll the dark chocolate out to 2mm thick and cut 4x squares. Cut the squares in half to make the triangle and then emboss them with the stitch tool. With a brush of water, stick the triangles over the ends of the red strands.
Step 10

To make the buttons, roll the lightest brown paste out to 3mm thick and cut 4x 10mm circles per button, sticking them together with a brush of water. Add the button holes using a cocktail stick - this will squash them a bit but just roll them on your work surface and they will be rounded again.
Step 11

Stick the buttons onto the front of the coat with a brush of water and cutting tiny strips of red paste, tuck each end into the button holes.
Step 12

To make the label, roll the white paste out to 2mm thick and cut a rectangle 6x 4cm, trimming the corners off one end. Using the 10mm circle cutter, cut a circle from the mid brown and place it the centre of the trimmed end. Using the 5mm cutter, cut through the circle and the label, just leaving the edge of the circle in place. Leave the labels to dry for a few hours before you attempt to write on them. If you like, the children can help you with this part. Write out the label with the edible marker.
Step 13
Ice your cupcakes and add the toppers to the cakes. They are now ready to be served.
You might also like…
