These fun flowerpots were made by our mummy blogger Anneliese. Taking the idea from ice cream cone cupcakes, she filled cones with a delicious sweet mix and made some cute flowers with her young children. Follow her step-by-step recipe for how to make these no-bake treats with your children
Ingredients
- 6 flat bottomed ice cream cones. I used Askey's
- 12g butter or margarine
- 45g miniature marshmallows
- 45g Rice Krispies
- 6 tsp Nutella or any chocolate spread
- 5 Oreo biscuits (filling removed)
- A small mixture of fruit suitable for cutting into shapes. I used strawberries and kiwi fruit
You will also need
- A small flower cutter (metal works better than plastic cutters) and 6 lollipop sticks.
WEIGHT CONVERTER
Method
- Open up the box of flat bottomed ice cream cones and ask your little one to line them up on the worktop ready for action.
- Next they can help to weigh out the butter and marshmallows into a large microwave-safe bowl. It is probably best for you to take over at this point and microwave the mixture in 15 second intervals, making sure to stir in between.
- Once the butter and marshmallows have melted, your child can tip the Rice Krispies into the bowl and stir quickly until the Rice Krispies are evenly coated in the marshmallow mixture. If you find that the mixture becomes difficult to stir, pop it back into the microwave for a few seconds to loosen it.
- Now you can assist your child as they use a teaspoon to spoon the sticky mixture into the cones. Make sure that they pack it down with the back of their spoon. You will be surprised how much can be squeezed in!
- You may find that there is still some marshallowy Rice Krispie mixture left over. I am ashamed to admit that I ate this while watching my little boy scrape the Oreo filling from each biscuit - if you have an exceptionally sweet tooth you could eat the filling too!!
- After your child has painstakingly scraped away all the Oreo white filling from the chocolate biscuits they can put them into a plastic bag. Pass them a rolling pin and let them go wild. My little boy was a bit unsure to start with. However, it wasn't long before I had to remind him that I'd rather the worktop didn't end up dented! He is stronger than he looks!
- Leave the bag of biscuit crumbs to one side while the Nutella is spooned onto the top of the cones. This is to help the 'soil' to stick to the rice Krispies. You could hold each cone steady while your child has the job of spreading the yummy Nutella onto each cone.
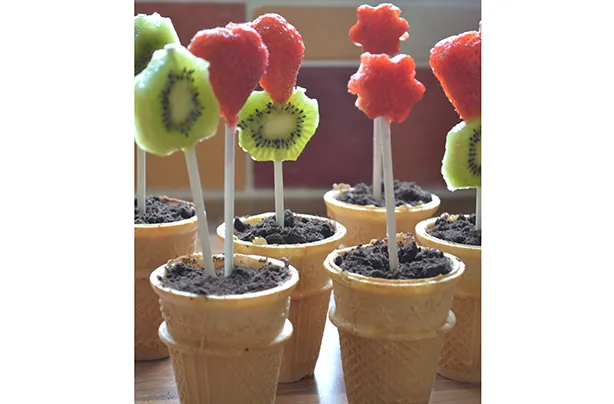
- Now is the time to sprinkle over the Oreo crumbs; this is the 'soil'. The little cones suddenly look just like muddy flower pots!
- Now to add the finishing touches in the form of fruity flowers. You can either use cutters to shape your chosen fruit into flowers or you can keep things simple and slice with a knife. Just be sure you don't overload the sticks with fruit, otherwise the finished article will become top heavy and topple over!
- Next push the fruit onto one end of each lollipop stick and push the other end of the lollipop stick down into the middle of the cones.
- There you have it! A few pretty planted pots which need zero upkeep; in fact all you have to do is eat them - hooray!
Top Tip for making Fruity flowerpots
Read all about Anneliese's cooking with kids adventures in our
Parenting advice, hot topics, best buys and family finance tips delivered straight to your inbox.

Author, writer and Mum of three, Anneliese Giggins has been creating recipes for Goodto.com for the past 9 years. She has also created food-related content for household names such as Daily Mail, Daily Express and Goodto.com. Her most successful to date was how to feed a family of 4 on £20 a week.