The Great British Bake Off 2015: Anneliese's #Bakealong challenge
We've challenged our mummy blogger Anneliese to #bakealong with the new series of The Great Brisith Bake Off 2015. Each week, she will be making her own version of the technical challenge. Anneliese, over to you...
We've challenged our mummy blogger Anneliese to #Bakealong with the new series of The Great British Bake Off 2015 (which we are extremely excited about, in case you hadn't realised!).
Every week, Anneliese will be rolling up her sleeves and taking on the dreaded technical challenge, reporting back on her successes and fails in this blog.
She'll be battling with batter, fighting with fondant and duelling with dough. Will she be able to cope under the pressure or fall at the first hurdle? Will she be able to cope with the complex challenges Mary and Paul will throw at her and the bakers each week? Well, there's only one way to find out. On your marks, get set, BAKE!
---------------------------------------------------------------------------------------
#Bakealong comp | GBBO recipes | Info on GBBO 2015
---------------------------------------------------------------------------------------
Meet Anneliese
The Great British Bake Off is back and I couldn't be more excited! Like so many, I look forward to plonking myself down on the sofa to watch it every week during the last weeks of summer. If ever I have lost my enthusiasm to bake, Mary Berry, Paul Hollywood and the exceedingly talented bakers, never fail to inspire me to get back to my mixing bowl.
The highlight of the Bake Off has to be the technical challenge. I say 'highlight' purely as a sofa spectator; I expect that it must be incredibly daunting to be presented with the smallest scrap of a recipe and to see the pile of ingredients hidden under a tea towel! I always feel sorry for the bakers who haven't even heard of the vague recipe, let alone made it. You can see the desperation in their eyes as they scan the room to see if the other bakers can offer them some clues. It makes me nervous just thinking about it!
Earlier this year, I was both surprised and honoured to be invited as their home cook on the Mel & Sue show. Then I found out it was the day that Mary and Paul were guests! I nervously cooked a light meal for them. Although the production crew had everything organised for me and I had practised the recipe countless times beforehand, it was still terrifying to have this immensely talented duo taste what I had made. My heart had never pounded so loud or so fast!

My own love of baking started when I was a child. If ever I was worried about something at school, I would find comfort in the kitchen. However, as I grew up, life got in the way. Although I still tried to bake from time to time, I would always keep things simple and reliable. Victoria sandwiches and easy tray bakes, these were my stay-safes. However, five years ago and after the birth of my first child, I wanted to regain some confidence by pushing myself to try new and more challenging bakes. I set up a blog, Rising To The Berry, and I baked my way through all 250 recipes from Mary Berry's Baking Bible. Of course, marriage and babies top my 'best thing I ever did' list, but this comes in straight after that! I made new friends, learnt new skills and finally realised that it didn't matter if I made mistakes; it really was all part of the learning process and inevitably made me a better baker!
As I worked my way through the recipes in the Baking Bible, I became more and more drawn into the first series of the Bake Off. I soon noticed that, naturally, a lot of the recipes used were Mary Berry's. I was able to compare my efforts to those of the bakers on the show, although I never felt capable enough to attempt any of the technical challenges!
What's the #Bakealong?
A few years have passed since I completed Mary Berry's Baking Bible and the team at goodtoknow thought it was about time for me to test my skills and bake each of the weekly technical challenges from the Bake Off. Eeeek! I'm well aware that I'm lucky not to have to endure the terror of Mary and Paul assessing my bakes, but I am someone who likes to follow a recipe. In fact, the thought of tweaking or altering a recipe makes me feel a little nauseous. How on earth will I cope with just a few words of ambiguous instructions?! However, rest assured that whatever the outcome, I will share it. There will be a weekly blog post where I will give an honest account of how the bake went and all the photos, good or bad. I'm far from the standard of the elite bakers on the show and I'm certain that I will have failures, but I also hope that there will be proud successes too!
WEEK 1: Frosted walnut cake
My #Bakealong challenge has added extra excitement to the Bake Off countdown, but also a sense of trepidation. I was nervous. Would it be a cake, bread or my worst fear, pastry? Thankfully, the details were revealed well ahead of the show and I was very grateful to discover that it was frosted walnut cake. I had made this cake before. Admittedly, it was four years ago, but it did help to calm my nerves.
Neil, my husband, was obviously keen to re-awaken my stress levels as he believed it would be ‘fun' to write out the list of ingredients needed for the recipe but to omit the instructions. I agreed nonchalantly that it would indeed make things more interesting and more real to the show, so that was that. I was ready to bake my first technical challenge.
As it's the school holidays, I have two young children at home with me during the day. Attempting to bake a complex cake with a five year old and a two year old in tow seemed like it would be too stressful, so with that in mind, I decided that I would start baking once the boys were tucked up in bed and I could concentrate and enjoy a little peace. I finally set to work at 8.30pm once the house was quiet and the dishes had been washed and put away.
The first task was to make the walnut cake. Looking at the list of ingredients in front of me, it all looked fairly self-explanatory. The only thing slightly out of the ordinary was that the eggs needed to be separated. I could cope with that! I had to guess at the oven temperature, but 180C seems to be a fairly typical heat to bake cakes - I went for that and hoped for the best. I creamed the butter and sugar together with my electric hand whisk. Suddenly, I was aware of how noisy it was. I thought of how nervous the bakers on the Bake Off must feel. After all, they had a film crew watching and filming their every move, while here I was I was nervously hoping the racket didn't wake my boys!
I carried on whisking as I added the egg yolks and vanilla extract to the creamed butter and sugar mixture. I folded in the flour, baking powder, salt and chopped walnuts. I could only guess that I was adding the ingredients in the correct order! I soon noticed that the mixture was very dry. I glanced back at the list of ingredients and realised that I'd forgotten all about the milk, so I quickly added it to the bowl. It was a classic Bake Off-style mistake, and I did wonder if I should have added it gradually rather than sloshing it all in! Last of all, I gently folded in the whisked egg white. The mixture was now ready to go into the cake tins. I only had two cake tins of the same size, so I had to hold one third of the mixture back to cook later.
Once all three cakes were cooked, I couldn't help thinking that they were rather flat with a pale and sugary crust. Matters weren't helped when I broke one of the sponges as I took it out of the tin. Whoops!
While the sponges cooled on a wire rack, I made a simple vanilla buttercream. There was just enough to allow me to fill and stack the three sponges. Things were going to plan but I still had to make the American frosting. It was getting late and I was feeling weary!

Although I had a vague memory of making this frosting before, I felt a bit lost and out of my depth at this point. It didn't help that I read the ingredients wrong and filled my saucepan with 600ml water, instead of 100ml! By the time the realisation hit me, I'd already added the mountain of sugar, so it all ended up being poured down the sink. What a waste! I felt fraught as I carefully measured out the water again and added another load of sugar to the saucepan. I couldn't remember to what temperature I needed to heat the water and sugar. This is where skill comes in. I wondered if I actually had any, as I didn't have a clue! I guessed that I needed to heat the mixture until it was boiling and syrupy. With one eye darting back and forth to the sugar syrup heating on the stove, I quickly whisked the egg whites until stiff. When I thought the syrup was ready, I slowly poured it into the bowl of egg whites, whisking continuously. That wasn't the end of it though! The final task is to whisk over a pan of simmering water. When we refitted our kitchen, we really should have given more thought to where we put our electrical sockets, as the wire on my whisk was at full stretch as I stood whisking for dear life!
After about 10 hot minutes, the American frosting was suitably snowy white and thick. I had to move quickly now to ice the cake as I knew it would set very quickly. But I couldn't find my oven gloves to move the hot bowl from the saucepan. I called Neil to the rescue and he rushed to my aid, playing the part of Mel or possibly Sue. He grabbed a stray apron to pick up the bowl and placed it next to the awaiting cake. We found the oven gloves immediately afterwards, naturally!
Quick as a flash, I spread the never ending supply of American frosting over the walnut cake. With a very generous layer I still had half a bowl of the frosting left and there was no way I could use it all. I added a few walnut halves to the top of the cake in a vague attempt at decoration. The finished cake looked more rustic than I had hoped but I wouldn't have felt ashamed to present it to Mary and Paul! It would do.

By now it was my bedtime, but I desperately wanted to test the cake before crawling under the duvet. If I wanted a good night's sleep, I had to be sure that it was palatable! Once the frosting had set, it was time to cut a slice. The sponge was surprisingly light but the walnuts were not something I noticed immediately. The buttercream was just enough to add extra moistness to the layers of sponge. The American frosting really had been worth the effort, not to mention the extra washing up. It had an almost meringue texture, quite delicious but very sweet! Neil enjoyed a large slice before bed and the remaining cake was taken into his office at work the following day and it was all gone by 9.30am. Hooray! I did enjoy this first bake as I was kept reasonably within my comfort zone. It took me 1 hour and 35 minutes in all, but I did have to wait for the third cake to cook!
Next week, I'll be attempting to make arlette biscuits, which I've never even heard of before. Eek!
WEEK 2: Arlette biscuits
It's the second week of The Great British Bake Off and this week, it's all about the biscuit. I actually think that biscuits are a bit of a dark horse. They are quick and easy to put together, but it all comes down to the bake and it can be tricky to get them just right. A moment too long in the oven and it's game over. I have burnt many a biscuit in my time and even the birds in our garden have disregarded the charcoal crumbs!
However, with all this in mind, I didn't feel too daunted by the thought of making biscuits for the technical challenge. Well, that was until I heard that it was a Paul Hollywood recipe. I was nervous, and only more so when I heard that I had to make arlettes. What on earth was an arlette?! The name of the recipe gives little, if anything, away. Apparently, an arlette is a reversed pastry biscuit. Suddenly, it was all so obvious - oh, if only! It didn't help that I'm not a fan of pastry. Don’t get me wrong, I love eating it but I don't have much success in making it. In fact, I find it much easier to visit a shop and pluck a ready-made version from the chiller cabinet!
When I came to making these mystery biscuits, it was 8.30pm in the evening. I'd spent the day refereeing my boys’ arguments and felt exhausted. Although puff pastry isn't particularly labour intensive, it is a lengthy process, so I knew I was in for a long night!
The first thing I had to do was make the reversed pastry. I had never made pastry this way and I admit that I didn't really know how to approach it. After some forbidden conferring with my husband, I decided that I would roll out the butter and wrap it around the dough, rather than the other way round. I made the dough in the usual way and then attempted to roll out the butter between two sheets of baking paper. The butter had just come out of the fridge and was rock solid. I pushed down hard on the rolling pin and it slipped off the butter, crushing my poor little fingers between the rolling pin and the worktop. Who knew baking could be so painful?!

With some elbow grease, I finally managed to flatten the butter and successfully rolled it out. I then rolled out the pastry dough before placing it on top of the butter. Unfortunately, when I tried to peel the butter away from the baking paper, I found that it was well and truly stuck to the paper. Arghh! I used a spatula to scrape it away from the baking paper so I was able to fold it over the pastry dough. I uttered a sigh of relief as I placed the buttery pastry into the fridge to chill for 20 minutes. Good riddance!
I carried on folding and re-rolling the butter and pastry for the next 2 hours or so and by the time I had finished, the butter had fully incorporated into the dough and looked like proper puff pastry. A HUGE relief! The team at goodtoknow told me that arlettes are similar to cinnamon palmiers but that you shape them a little differently.
I sprinkled some sugar over a piece of cling film before rolling out the dough. I always use cling film when rolling out dough as it stops me from using extra flour. Next, I needed yet more butter. However, this time I melted it and brushed it over the surface of the pastry. I tried not to think about the fat content of the resulting biscuits! Last of all, I sprinkled some sugar and cinnamon over the layer of melted butter to add the all important sweetness.

I had been so proud of myself for remembering to roll the dough out on the cling film. Sadly these feelings of pride soon became feelings of fury as the pastry stuck like glue to the cling film! I was longing for my bed and was really beginning to dislike these arlette biscuits. They had better taste delicious after all this effort!
I used what little patience I had left to laboriously unpeel the sticky pastry from the cling film and then to roll it up into a spiral. The last scrap of information I'd been given was to slice the roll of dough into chunks and then smother them in icing sugar before rolling out each piece very thinly. I set to work and initially tried to roll my pieces of dough very thin but soon gave up on that notion when each piece of dough stuck fast to my rolling pin. By now, I couldn't have cared less about the correct size, shape or thinness of my biscuits! I'm not sure if I would have become so blasé if I had been in the Bake Off tent. Then again, I’d probably have been led off in a white van by this point anyway...
I rolled the dough as thin as I could manage, transferred it to the baking trays, and then placed the trays into a hot oven. I wasn't sure how long to cook them, but waited until they were crisp and golden brown, which was about 15 minutes.
My arlettes were disappointing to look at and certainly did not reflect the three hours I had spent making them, not to mention the stress I had endured! I do wonder if Paul enjoys seeing the bakers suffer! My biscuits were certainly not up to standard; they were all different shades of brown and an assortment of shapes. However, I was pleased that they were crisp and they did taste good. My 5-year-old son kept going back for more and when asked if he liked them, happily exclaimed" “Mummy, I don't just like them, I really enjoy them!” So they can't be all bad!
These arlettes are indeed very similar to a palmier. The only real difference is in the texture. The flake was crunchy and crisp, so it was indeed more in keeping with a biscuit, though I do think it a bit unusual to class pastry as a biscuit!
I can't say I really enjoyed this second challenge; I just feel relieved that it's over and NO, I am not tempted to make these arlette biscuits again! However, if you enjoy making pastry treats, they will be right up your street. Now I'm full of trepidation for next week; what on earth will be thrown at me next?!
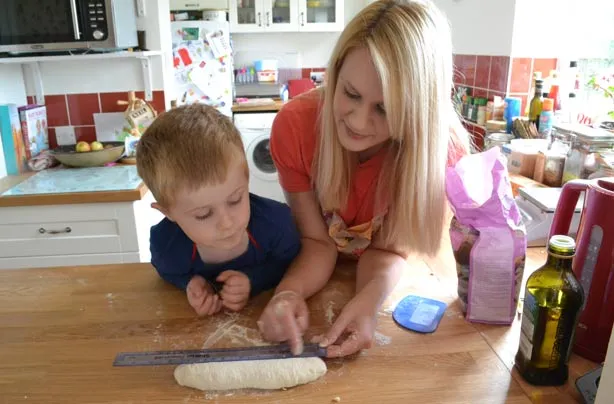
WEEK 3: Baguettes

I have many weaknesses when it comes to food, but the one thing I find impossible to resist is bread. I quiver with delight at the thought of a crusty cob, a farmhouse loaf or a flavoursome focaccia; I am powerless to their allure! When I heard that this week’s Bake Off would be about bread, I was excited but also a little anxious. Although I can often be found in the bakery aisle of my local supermarket, I rarely roll up my sleeves to make my own. However, from time to time, I do have the desire to bake bread. I enjoy seeing my loaf rise in the oven and filling my kitchen with the lovely smell of baked bread. Each time, I'll declare that I'll never buy bread again, only to find myself sneaking a loaf into my shopping trolley a day or two later...
I suppose that, much as I love the idea of baking my own bread, the lengthy process has always put me off. Also, my attempts have always been mediocre. The crust is never crusty enough, the crumb is too chewy or doughy and I probably don't help matters by always sticking to the same recipe! I've never made baguettes before but unlike last week's arlettes, at least I know what they are!
As it was the weekend, I made fresh baguettes ready for tea time. My first task was to weigh the flour, salt and yeast in the bowl, using a classic baguette recipe as my guide. I added warm water and brought the dough together with my hands. The dough seemed to be coming together nicely, but I I remembered what I had learnt from previous Bake Off episodes - how Paul Hollywood insists that a dough on the wet side produces a better bread. With this in mind, I dared to pour extra water into my bowl. When the dough became sticky and difficult to manage, I automatically reached for the flour but I managed to resist the temptation. I peeled the gloopy dough out of the bowl and allowed it to slop out onto my previously clean worktop! Instead of adding flour to the worktop, I trickled a little olive oil over the surface instead. I know this method is used when making oily breads such as focaccia but no doubt I shouldn't have used it when making baguettes. However, I persevered regardless! Using oil instead of flour seems a strange concept, but it really did make my dough less sticky and, after the initial mess, the dough started to transform before my eyes. It became smooth and elastic and easy to knead into submission.

After 10 minutes of haphazard kneading, I placed the dough into a clean bowl and covered it with cling film and a towel. I had to leave the bread dough to rise for an hour.
While I waited for my bread, I should like to say that I walked off and made myself useful. Unfortunately, I spent most of the time lifting up the edge of the towel to peek at my slowly growing dough. It wasn't until the final half hour that things really started to move. Once the hour was up, the dough was suitably puffed up and had doubled in size. YES!
I couldn't help but make comparisons between my usual loaf recipe and this baguette dough. So far, the only difference had been adding a bit more water.
I tipped the puffy dough back out onto the worktop. This time, I did add a fine sprinkle of flour to the worktop; I didn't think a little would hurt! I gently pushed the dough around. I didn't want to knead it too vigorously and knock out all the air. I have to admit, though, that it's pretty satisfying to hear the air bubbles pop!
Now I had to shape the dough. Of course, I would have loved to have made the long baguettes, the ones I always like to buy. Unfortunately, as I do not own a giant bakery-sized oven, I would have to opt for sensibly sized mini ones instead. I decided to make four baguettes with my dough. My husband, Neil, watched me slice the dough into four and jokingly remarked that I should weigh the dough, as they do on the Bake Off. I took this suggestion seriously and was soon turning my scales on. I couldn't help feeling a bit smug when my second piece of dough weighed exactly the same as my first. I congratulated myself and joyfully returned the dough to the worktop with what I thought was an artisan baker’s flick of the wrist, only for it to hit the first piece of dough. Of course they stuck together, so I had to pull them apart and start all over again. Typical!

I took a piece of dough and rolled it into a long sausage shape, making sure that I kept the 'seam' on the underside. I carried on, shaping two more pieces of dough and transferring them to lined baking trays. By now my 5-year-old son was keen to get in on the action, so he came over to complete the final baguette; I even had him measuring it with a ruler to be sure that it was the same length as all the others! I'm not sure that having the assistance of a 5-year-old is allowed during a technical challenge as no doubt it gave me an advantage!
I left the dough to rise one final time. I told my son that it would take an hour for the baguettes to rise and that he could keep watch for me. Every few minutes I would be told: “Mummy, they are growing!”
The baguettes did indeed grow, but they looked more like ciabattas; they had grown wider but were disappointingly flat. Just before putting the baguettes into the oven, I sprinkled some flour over the top of the dough and then slashed the top of each baguette with a sharp knife. This was when I realised how blunt and ineffective my supposedly sharp knife is. I placed the baguettes into a hot oven and even went as far as adding some warm water to a tray at the bottom of the oven to create steam. I hear that this is good for a crisp crust.
While the baguettes cooked, the baguettes rose (phew!) and that glorious, unmistakable smell of baking bread wafted throughout the house and made our tummies rumble. It took around 25 minutes for my baguettes to cook and they were golden brown when I took them from the oven. I proudly laid them out on a wire rack to cool. As it was getting late, my husband had saved time and had given the boys a bath while the baguettes cooled. Just as I was about to slice into the first baguette, Oliver, my two-year-old, ran over in his dressing gown and damp hair to inspect the bread. Oliver is well known for liking his food, so it was no surprise when he chose his favourite and took a bite straight out of it!
I filled the baguettes with cucumber and tomatoes from my father-in-law’s garden. The baguettes had a crunchy crust and a soft crumb. My five-year-old proudly announced: “This bread is really good; I'm an excellent baker”, which made me smile! I have to say that this is the best bread I have made, by far. I think it must be down to adding more water to make a wetter dough. I will have to try it that way again. It really has made me want to make more bread - not every day, but definitely on a regular basis.

I really enjoyed this week’s technical challenge. It was challenging enough to push me and most importantly, to use my own initiative, which is something I don't do often enough. I love how these challenges are making me attempt things I would not usually dare to try. They might not always work out but, when they do, it's a great feeling!
Will I be brought back to earth with a bump next week?!
WEEK 4: Spanische Windtorte
I always knew that the technical challenges would become harder as the weeks passed but nothing could have prepared me for dessert week! The fourth challenge was a Spanische Windtorte, the name gave nothing away but my heart sank when I was informed that it was a complex meringue and cream dessert, where piping skills are put to the test. My first concern was my lack of piping skills, they are nonexistent! My feelings of dread deepened when I saw the list of ingredients. It was painfully clear that I would have to make violet fondant flowers, thirteen to be exact. What?!!! My previous fondant efforts have all ended badly, so this did nothing to rebuild my confidence. At this point it would have been easy to enter into a full state of panic but, after talking it through with my husband, I remembered that I had made several of Mary Berry's tricky meringue desserts before and that I'd also made the meringue frosting. I wasn't sure if I needed to make my own fondant for the violets. However, since Mary and Paul had been shocked to the core on a previous series because a baker had 'cheated' and used shop bought, I didn't want to chance it! I was prepared to make my own, for the very first time. The cream filling was surprisingly simple, just a massive amount of double cream with icing sugar and fruit. When I judged the Spanische Windtorte as individual components, it didn't seem quite so terrifying!
The weather has been pretty abysmal throughout the whole of August but, on the day I came to make my Spanische Windtorte, the sun blazed and the temperature rocketed up to 28 degrees! Not the best day to put your oven on. I knew it would take a few hours to make this complex dessert, so I donned my apron at 10am and set to work on the first stage of the recipe. To make the meringue I needed eight egg whites. I cracked each egg into my hand and allowed the gooey whites to trickle through my fingers and into the bowl. I tipped the tiny quantity of cream of tartar in with the egg whites, and then used my hand electric whisk to whip them into voluminous fluffy clouds! Once the egg whites were suitably stiff I could start to add in the caster sugar. I have made meringue quite a few times in the past, so I remembered to add the sugar gradually, just a tablespoon at a time, whilst continuously whisking. It's important to add the sugar slowly so that it has time to dissolve. By the time I had finished with my whisk, the meringue had become glossy and very thick, just right for piping, eeek!

Before I started the piping I had to draw five circles onto some baking paper. I then had a great job finding five oven trays. I ended up using a mixture of all shapes and sizes, one being a pizza tray! With all my trays lined up and covered with my baking paper templates, I was ready to spoon two thirds of the meringue into a piping bag. I fully filled two of my hand drawn circles with meringue and then piped three separate rings. The two discs would make the base and lid and the three rings would form the sides of the Spanische Windtorte. I managed to squeeze all of the meringues into my double oven, but only just! There was no rest while they cooked as I had to get on with the part I had been dreading most, the homemade fondant.
I was surprised that I only needed three ingredients to make fondant and it wasn't as awful as I'd anticipated. I can't say it's an experience I wish to repeat though! After bringing the butter, golden syrup and icing sugar together, I was left with a fondant which needed to be coloured. I had some leftover food colouring gels from my son’s birthday cake. I was too mean to buy any more, so I just made do with what I already had. This resulted in very garish violets! The colour of my violets was the least of my worries though as, due to a lack of sugar craft skills, my flowers looked as though they had been trampled on! After the relief of finishing my last violet I had to head straight back to the oven to remove all the trays of meringue. I couldn't turn the oven off though; its work was far from done.
Once the meringues were cool enough to touch I gingerly pulled the baking paper away and, to my utter surprise, there were no meringue casualties. This must have been a first! For the next stage I had to start construction work. I hadn't allowed myself to read the recipe so my husband had to tell me how to assemble my meringue. I wasn't sure if the bakers in the tent would be allowed such a luxury! I placed the meringue base onto a plate. I was worried about putting a plate into the oven, so used an old unloved dinner plate instead of anything fancy. I used some of my reserved meringue to stick a ring of meringue on top, followed by the next two rings. I piped the remaining meringue around the sides of the rings and base and then used a palette knife to make it as smooth as I could.
The meringue shell had to go back into the oven again so that the outer layer could cook and harden. Again, there was no time to rest as I had to move straight on to making the meringue frosting, phew! By now my feet were complaining and my back felt close to collapse. I glanced at the clock and saw that I had been standing for over three hours. No wonder I was in such discomfort! Neil, my husband, took pity on me and made me a mug of tea while I busied myself with the frosting. I separated more egg whites into yet another bowl and added in a mountain of sugar. This time I had to whisk over a pan of simmering water, until the mixture turned thick and white. Cooking on a hot day really isn't a good idea; I was roasting! Thankfully it wasn't too long until I was able to take the bowl off the heat but I had to carry on whisking until the meringue was at room temperature, which felt like an eternity.
Once the meringue shell was ready I had to take it from the oven. I breathed a sigh of relief that the plate was still intact! The meringue needed to cool down a little before I attempted to pipe on any decoration. I fitted a large star nozzle to a piping bag, filled it with the thick meringue frosting, took a deep breath and added some oversized 'frilly bits’ to the meringue shell and also to the lid. I wasn't happy with the look of my piping but I was too tired to let it worry me! I staggered back to the oven and placed the decorated meringue and lid into the oven for their final visit.

Thankfully the meringue was only in the oven for half an hour and that allowed me my first sit down in over four hours. I was feeling light headed and I wondered how the bakers must have felt, working on such a demanding bake and with all those cameras following their every move. It must have been torture!! At last I was able to turn off the oven and take out the meringues. While everything was cooling down, I made the cream filling. At last something easy and straightforward! I only had to whip the cream, add some icing sugar, orange blossom water, raspberries and chopped strawberries. At this point I did start to wonder if it would have been easier to make an Eton mess. I was basically making the same components but the Spanische Windtorte seemed like an unnecessarily complicated version!
Finally I was moving on to the finishing touches. I used a little leftover meringue to attach my garish violets to the lid and to the sides of the shell. I spooned the fruit and cream into the middle of the meringue shell until it reached the very top. At last I was able to place the meringue lid proudly on top. I was finished. It only took me five hours, argh!!
I stood back, looked at my Spanische Windtorte and felt elated. I had done it and it had worked - hooray! I was literally jumping for joy. I was pleased that it had been a success and so glad that this challenge had made me try it. I would never have tried it otherwise, not in a million years! Sometimes a recipe can seem so daunting but, when broken down into little steps, it’s not so bad, well not on this occasion. I may well change my tune next week!
I really am scared about what next week holds. Can it really get any harder? Yes, yes it can, eeek!

WEEK 5: Gluten-free pitta breads
‘Alternative ingredients’ is the theme of this week’s Bake Off and surely it will test the bakers to the limits. Of course we can still expect to see an array of cakes and bakes but it won't be easy to omit sugar, wheat and dairy without compromising on taste.
I was worried what sort of recipe I would have to tackle; I imagined it would be cake based, so I was surprised to learn that it was, in fact, gluten-free pitta breads. This didn't sound too difficult initially but it didn't sound particularly enticing either! I have made regular pitta breads once before, but I have never made gluten-free bread. In my teenage years I tried giving up wheat in an attempt to lose weight. I was miserable for a month until I finally relented and went back to my favoured farmhouse loaf. I decided that I'd rather have a thick waist than try to eat the crumbly gluten-free alternative! Of course that was a long time ago and I could only hope that things have improved since then. However, I really couldn't believe that I'd be able to make a decent gluten-free bread. Surely Paul Hollywood was asking the impossible?

After a long drive back from holiday, I was straight into my kitchen to make a start on the gluten-free pitta breads. I thought I'd get the first stage done before making a really quick evening meal. I had bought the ingredients whilst on holiday, so I simply emptied the carrier bag out onto my worktop and grabbed a bowl from a drawer. So far so good! First of all, I had to deal with the psyllium powder. I'd had to purchase a big bag of this powder from a health food shop, so it had proved to be very expensive, especially as I only required a small amount. I added the psyllium to some water, gave it a quick stir and left it to one side to swell. I moved my attention to weighing the gluten free flour into the mixing bowl. I was using a lot more flour than I usually would and I also noticed that it resembled cornflour in both look and texture. I sprinkled the Nigella seeds into the bowl. I have never seen Nigella seeds in a Pitta bread before but I'm all for trying something new! The sugar, salt and yeast were familiar ingredients, but I was surprised to use three sachets of dried yeast. It seemed an awful lot but I suppose it makes sense to use extra yeast in gluten free bread. It needs a bit more oomph!
It was now time to add some liquid to the dry ingredients so I carefully measured in a little white wine vinegar, several eggs, olive oil and the psyllium. The psyllium powder and water had come together to form a thick brown paste. It looked revolting! It was actually quite tricky to scrape it from the measuring jug and into the awaiting bowl. The consistency reminded me of wallpaper paste; anything else I'll leave to your own imagination! With all the main ingredients finally in the mixing bowl, I used my wooden spoon to bring it all together. I soon realised that it would be quicker for me to use my hands instead. Normally this wouldn't have troubled me but, after seeing what had gone into the dough, I felt somewhat reluctant! The dough already seemed quite wet but I still had to add more water. It was a very sticky business and my hands were soon smothered. I turned the dough out onto the worktop. It was tempting to add flour to the worktop but I managed to resist. I was pretty sure that the dough should remain on the wet side. Of course the dough was impossible to knead. However, I didn't think this would matter as there was no gluten to pound into submission. I just gave it a few gentle prods until I felt the dough was vaguely smooth. I placed it into a bowl, covered it with cling film and left it to rise. In this time I got on and made dinner. I placed the dough next to the hob whilst I cooked the pasta, hoping the extra heat might help to wake the yeast up!
By the time we had eaten our meal the dough had doubled in size. I honestly couldn't believe it when I saw that the dough was almost level with the top of the bowl! I turned the dough out onto the worktop and, on this occasion, I did sprinkle over a little flour, otherwise it was highly likely that I'd get in a mess when it came to using my rolling pin. The dough felt spongy and full of air as I carefully sliced it into twelve pieces. I wasn't sure if I could be bothered to weigh each peace equally. At this point my husband took on the role of Paul Hollywood. He folded his arms, muttered “Hmmm, good luck,” then walked away shaking his head. This had me reaching for my kitchen scales!!
Thankfully there was no more proving time needed, so I could carry on and shape the pitta breads. I intended to roll each piece of dough into oval shapes; alas this didn't happen. My pitta breads ended up in very rough, uneven shapes. I was too scared to re-roll the dough in case I overworked it; heaven forbid! My pitta breads were massive, so I could only fit two to a baking tray. This meant I would have to make several batches. Great!

I tentatively placed the pitta breads into a hot oven. I didn't think that they would take long to cook, so I stayed by the oven with my nose almost pressed against the glass door. All of a sudden the top left Pitta bread went 'pop'. It had blown up like a balloon! Sadly the other pitta's didn't rise much at all. I can only think that this one pitta had found the hot spot of my oven! I waited for the heavenly scent of baking bread to waft around the house but of course this never happened, which was disappointing.
The cooked pitta breads were far from pretty. They were an unappetising shade of brown and they looked more like Naan breads than a Pitta! When I cut into my best pitta bread, I was relieved to see that I had a sizeable pocket inside and that it was cooked through. Later I cut into several more pittas and most had the desired pocket, but they were far less impressive! Five of my pittas remained completely flat, so they really were more like Naan bread! The taste was rather surprising but in a good way. Neil, my husband, was very taken with them. He mentioned that he would never have guessed that they were gluten free and thought they tasted just like a typical pitta. However he did think the Nigella seeds were a strange addition! I was a little harder to please; I could tell the difference. Although they did taste nice enough, I thought that the texture was quite crumbly. The flavour was fine but the difference was in the texture. However, these pitta breads are miles better than those shop-bought offerings I chewed on almost 20 years ago! I'm lucky that I don't need to follow a gluten free diet but, for those who do, then there is hope of decent bread; just don't be put off by that psyllium powder!
I certainly wouldn't class this technical challenge as a success as only half of my pittas worked but I'm grateful that I managed a few pockets! I wonder what next week will bring. Part of me is nervous but the other is excited about the prospect of learning something new!
WEEK 6: Flaounas

It's hard to believe that it's already six weeks into the Bake Off. This time, it's pastry! This was not good news for me. Pastry has long been my nemesis. There are tears and tantrums when I try to roll it out or attempt repairs, not to mention the fear of the dreaded soggy bottom!
Suffice to say that I have been approaching pastry week in a state of panic. My anxiety was not helped when I was told that I'd be making flaounas. What is a flaouna?! They say that knowledge is power. Well, if that's the case, I was doomed from the start. This was yet another Paul Hollywood recipe, which did little to lift my spirits; it was bound to be ruthlessly difficult. I still haven't forgiven him for last week’s gluten-free pitta breads! Apparently, flaounas are popular in Cyprus, which might have been why two of the ingredients were completely new to me. I had no clue where I could buy mastic powder and mahleb powder. I searched online to see where I could buy them but soon gave up on the idea. I couldn't purchase them from the same 'shop' and I was put off by the delivery charges, which would have cost more than the mysterious ingredients! However, I was able to find out that mastic powder is the dried sap of the mastic tree and mahleb is a popular Middle Eastern spice. I wasn't too sure about dried tree sap, so I decided that I could do without!
When I came to make these flaounas, it was early evening and I was feeling weary after a day out followed by a fraught trip to the supermarket. When will we learn that supermarkets and young children do not mix? Once in the refuge of the kitchen, I looked through the long list of ingredients and tried not to feel overwhelmed. First of all, I had to make the filling. The filling consisted of a LOT of pungent cheese. The mere sight of it was enough to raise my cholesterol! I had to use two different kinds of cheese and as I stood grating them, I wished that my food processor had a grater attachment. Alas, it does not, so I stood and grated for what felt like a very long time.
Once the mountain of cheese was in a large mixing bowl, I added a little plain flour, yeast, semolina, dried mint and sultanas. The dried yeast really confused me. I wasn't sure why it was included in the filling. Surely it wasn't supposed to rise?! The eggs and milk went into a measuring jug and I gave them a quick whisk with a fork before pouring into the bowl. I stuck my hands into the cheesy mixture and brought all the ingredients together. Using my hands was the only way to make sure everything was well combined. It was a stiff mixture, so it would be easy to miss little pockets of uncombined flour. I covered the bowl with cling film and left it to one side while I got on with making the dough.

If I was confused by the filling, then I was even more confused by the dough. I had been expecting to make shortcrust or puff pastry. However, judging by the list of ingredients for these flaounas, I was making a bread dough. I wondered if I might be missing something, though maybe I was making a different kind of pastry; perhaps this is where my lack of knowledge was evident? The mastic powder and mahleb powder were supposed to be included in the dough. I had to compromise and use alternative flavourings. I got a bit carried away and added all manner of spices to the bread flour; cumin and turmeric to name just two! After adding the sugar, salt and yeast, I added some softened butter and tepid milk. There was no water in this dough, just milk so it seemed like it might be a soft dough. The dough started off quite sticky but once all the ingredients had combined, it became quite stiff. It was easy to knead it on the worktop but quite hard going on my biceps, as it was such a firm dough with very little stretch to it. This had me worried, as most of Paul Hollywood's bread dough is on the wet side. So maybe this was more like a pastry? I was confused AGAIN!
I covered the dough with cling film and left it to rise. Meanwhile, I made the glaze. I was rather surprised to have to use sesame seeds for the glaze, especially as I had to use so many. I boiled them in water and then laid them out on a tea towel to dry. As I was spreading out the sesame seeds, I realised that I'd forgotten to add the tablespoon of white wine vinegar! I could only hope that this wasn't a crucial ingredient!
I left the dough to rise for almost an hour and a half. This might have been too long but after an hour, it had only risen a little bit so I decided to risk leaving it a little longer. Even after this extra time, the dough was resolutely firm and had not quite doubled in size. I sliced the dough into 12 pieces and used my scales to weigh each piece. For the first few pieces, I painstakingly ensured they weighed exactly the same but by the last few, I wasn't so fussy. This 'it'll do' attitude wouldn't go down well in the Bake Off tent!

The toughest part of this challenge has to be rolling the dough out into 12 squares. My wrists! The dough was so elastic. Just when I thought it was the right sort of size, it would spring back. It was so frustrating and it took me about 45 minutes to complete all 12. To be honest, my 12 'squares’ ended up resembling 12 round pizza bases. Oh well!
The next stage was to take each piece of dough and to press them on top of the sesame seeds, so that the underside of the dough was covered. I was soon cursing the tiny little seeds as they scattered across the worktop and merrily bounced onto the floor. After the fun of the sesame seeds, it was time to add the almost forgotten cheese filling. No, it hadn't risen! I placed heaped spoonfuls of the filling into the centre of each piece of dough. Once happy that each flaouna would have vaguely the same amount, I flattened and spread out the filling so that it covered the dough. To stop the cheese from melting and escaping over the sides, I brought all 4 edges of dough up to encase a large amount of the filling, leaving the centre of the cheesy mixture still visible. It didn't look very appetising! I brushed egg yolk over the edges of the dough and then it was time to place them all into the oven. I needed a lot of baking trays and I was very glad of my double oven, otherwise I'd never have managed to cook them all at once.
I cooked the flaounas in a fairly hot oven for 15 minutes and then lowered the temperature for a further 15 minutes. The cheesy aroma that wafted from the oven was well received by my husband. He could barely wait to scoff one! The cooked flaounas were golden brown and none of the filling had leaked. Phew. I wish I could say that they looked delicious but as they were several shades of brown, they were quite boring in appearance! We let the flaounas cool down a little before tucking in. Neil, my husband, really enjoyed his but said it was like eating a luxury Welsh rarebit toastie! I took a bite and had to agree. Thankfully, we both like rarebit toasties! The cheese was a bit too strong for my liking but the sultanas provided a welcome sweetness. Neither of us could taste the mint, which I was quite glad about. I needn't have bothered with my medley of spices as they weren't noticeable either. Maybe I should have forked out for the tree sap after all! The dough was definitely bread; it was very nice in texture but not as soft as I had expected. After making and eating these flaounas, I'm still left in a state of confusion. They were very nice but I could have made an equally tasty Welsh rarebit in less than a quarter of the time and it would have left me with less washing up too! Oh well, at least I didn't have to make pastry!

Will next week’s bake be something more familiar? Oh, I do hope so!
WEEK 7: Victorian 'tennis court' fruit cake
This week, we'll be heading back in time to the Victorian era, as the Victorians paved the way for baking as we know it.
It was Mary Berry's turn to set the technical challenge, with her recipe for Victorian fruit cake. It was great to recognise a Bake Off recipe considering most of the technical challenges have left me clueless! I have made Mary's Victorian fruit cake, once before, a few years ago. I started to feel optimistic. Maybe, just maybe, it might be successful? Of course, I shouldn't have allowed myself to hope for a straightforward bake - this was a technical challenge after all. My heart sank when I realised that I also had to make my own marzipan, fondant, royal icing and worst of all, decorate the cake to resemble a tennis court! Oh, this was bad. Very bad. I pondered how I could possibly make an edible tennis court. I had nothing to go by, so it was very daunting indeed! However, I couldn't put off the bake forever and I soon found myself in the kitchen, feeling very nervous. If I had been in the Bake Off tent, this would have been the point at which I would have hung up my apron and quietly walked away.

Thankfully, I was in the comfort of my home with no camera crew or disapproving glances from Paul. I took a deep breath and set to work. The first part was the nice part; the baking. I was happily within my comfort zone as I snipped my way through a mountain of glacé cherries and dried apricots. The Victorians must have enjoyed fruity cakes as I also had to add pineapple and sultanas. This cake was certainly one way to get your five-a-day! To the fruit, I added some chopped, blanched almonds and lemon zest. That was the fruit part taken care of. Next, it was time to make the cake batter. This was a simple affair of typical sponge cake ingredients, consisting of flour, eggs, caster sugar, butter and ground almonds. I'm used to using dark brown sugar and treacle in my Christmas cakes, so caster sugar was quite out of the ordinary.
I whisked all the cake ingredients together until the mixture was smooth and then carefully folded in the huge quantity of glossy fruit. It smelt wonderful! At this point, I was faced with my first conundrum. What shape tin should I use? Surely a tennis court cake should be rectangular in shape? However, all my rectangular tins were far too big. Unfortunately, my square tin measured too small but my circular tin was just right. No doubt I opted for the wrong shape but it would just have to do. I made a typically poor attempt at lining the tin with baking paper and then spooned in the fruity mixture. Into the oven the cake went and there it would stay for quite some time. These large fruit cakes need to cook on a low heat, for anywhere between 2½ to 3½ hours. I could sit and watch it cook or I could get on with my life. I wasn't stuck in a tent, so allowed myself to escape the kitchen!
After playing Lego with the boys and eating lunch, it was time for me to check on the progress of the cake. Two hours into the bake and it was nowhere near cooked in the middle. After another half an hour, it was still a bit doughy in the centre. It's so hard to judge when a deep and heavily fruited cake is ready, but that's probably a big part of this challenge; it has to be perfectly baked. After nearly three hours, the cake was cooked, or at least appeared to be!

Of course, a big cake takes a long time to cool down and this Victorian Christmas cake was no exception. It took four hours to come down to room temperature. I didn't want to put a hot cake into our fridge but I expect some of the bakers may employ such tactics! It was getting quite late by the time I started with the decorating side of this challenge. I decided to make the royal icing first, so that I could get on and make the tennis net. I had a sense that this would be a fruitless task.
My first failing was to forget to insert the nozzle into my piping bag. The royal icing was already made and inside the piping bag at this point, so I simply snipped the end from the bag and offered a silent prayer as I piped onto a piece of baking paper. My attempt vaguely resembled a white picket fence, not a delicate tennis net! Hey, ho! I left it to dry while I got on with the marzipan. I had made Mary's marzipan a few years ago and swore that I'd never make it again. The marzipan had been little more than a paste. I felt certain I would fail again, so I was amazed when, this time, the ingredients came together beautifully. I can only assume that I had read the recipe wrong last time. The marzipan did become a little oily with just a tiny bit of handling, so I quickly wrapped it and shoved it in the fridge while I got on with making the fondant. Again, I used Mary's recipe for this and it was very straightforward. I was surprised how quickly the icing sugar, egg white and liquid glucose came together and how white the resulting fondant was. Sadly, the fondant didn't stay white for long as I quickly turned it into a lurid green - a perfect colour for the grass tennis court!
Now it was time to decorate the cake. I looked at my 'naked' fruit cake and noticed the grooves and uneven sides. Maybe next time I should pay more attention when lining the tin! Despite all the imperfections, I decided to decorate just the top of the cake. I had a sixth sense that if I tried to cover the entire cake with my oily marzipan and super soft fondant, it would turn into one big mess.
First, I rolled out the chilled marzipan. It was sticky and fell apart every time I tried to lift it. The air turned blue as I muttered choice words under my breath. I felt close to tears when the marzipan broke into pieces for what felt like the 100th time. All I wanted to do was curl up in bed with a chocolate bar the size of my head but alas, I had to plough on. I would not let this beat me! Finally, the now hated marzipan was in place. Yes, it was messy, but at least it was on the cake!

The fondant was a bit easier to roll out and I soon had it stuck on top of the layer of marzipan. I could only find an oversized sharp knife to trim off the excess but I didn't care any more. I just wanted to get it finished. I used a cocktail stick to mark out a very rough tennis court outline. I enjoy watching tennis, so can only hope I got the lines right! With the leftover royal icing, I piped along my guide and was pretty happy with the results. It wasn't very neat but at least it looked like a tennis court. I gave my tennis net a gentle prod but it was still wet. I looked at the clock; it was already 9.30pm. There was no way the net would be ready before midnight. I was so annoyed; I wanted closure!
The following morning I reluctantly finished the last step of this technical challenge. For an extra finishing touch, I coloured some leftover marzipan yellow so that I could add tiny tennis balls to the court. I drew the line at modelling tennis rackets or people, though I am sure some of those clever bakers will have gone that extra mile!
Now it was the part I'd been dreading; removing the tennis net from the baking paper and putting it onto the cake. First, I made little holes in the cake so that the net could be inserted. Then, very gingerly, I peeled the paper away from the net. I could feel and see that the royal icing wasn't dry all the way through. This was only going to end badly! The net came away in one single piece but just before placing it on to the cake, it broke into three pieces! I propped my broken net up but after just a few minutes, it had disintegrated even further. Of course, I should have given the royal icing longer to dry, but the bakers would have had less time than me. How on earth did they manage? I really can't wait to see how they got on!
I had intended to pipe more royal icing around the sides of the cake but after the sad collapse of my net, I lost heart in it... As I looked at my feeble attempt at a tennis court, I couldn't help wondering why the Victorians chose to have a tennis scene on top of a Christmas cake; surely tennis is something that is enjoyed over the summer months? Oh well, each to their own! I cut a huge slice from the cake and was pleased to see that it looked cooked through and firm enough to hold its shape. We all enjoyed this cake. It's the ideal fruit cake to enjoy with a cup of tea, but I think I'll stick to my usual rich, dark Christmas cake this year!

This technical challenge took me 24 hours to complete and my cake decorating left a lot to be desired. Thankfully, the cake tasted good and to me, the taste is more important than the way it looks. It's a good thing I think that way!
I dread to think what next week holds...
WEEK 8: Mokatines
It's the quarter finals! It's hard to believe that the show is entering the final stages and only a handful of bakers remain. This week’s theme is patisserie, which will certainly test the five remaining bakers (and me, for that matter!).
Simple traybakes and Victoria sponges are my favourite things to bake. They cause little stress and take just minutes to prepare. Surely, patisserie is for professional chefs, not for amateur home bakers?! The pastries and cakes are always exquisite and each tiny detail is perfect. I'm all fingers and thumbs, so I didn't know how I would cope with this week’s technical challenge. This really would be way out of my baking comfort zone!

Mokatines are this week’s technical challenge, as chosen by Mary. The recipe consists of a Genoese sponge, crème au beurre mocha (that's coffee butter cream) and a soft coffee icing. Four years ago, I had made this recipe and it hadn't gone too well. I could only hope that I had learnt from my mistakes!
Many of the technical challenges have taken most of a day to complete but these mokatines, in theory, should only take a few hours. With this in mind, I decided to make them once my boys were in bed. It's always easier to concentrate in the peace and quiet! I felt quite calm as I tied my apron and made a start on the Genoese.
First of all, I melted the small quantity of butter in a saucepan and then took it off the heat. I wanted it to have time to cool before adding it to the cake mixture. The next step was to whisk the eggs and sugar together in a bowl. It's important to get as much air into the mixture as possible, so I had to whisk for quite some time. It's so easy to get bored and give up too soon but I waited until the mixture became thick, with a mousse-like in appearance. When it came to adding the flour and melted butter, I did so in two stages. I carefully folded in half the flour and cursed all the hidden pockets of flour I kept finding. Just when I thought all the flour had disappeared, I'd find a massive heap at the bottom on the bowl! Next, I poured in half the butter, around the edge of the bowl, and gently folded it in. Again, the butter had the habit of sinking to the bottom of the bowl. As I folded in the remaining flour and butter, I was aware that the mixture had lost some of the air I'd worked so hard to achieve. It suddenly looked quite wet and flat. This didn't bode well. Any whiff of confidence was gone. I didn’t want to put the cake into the oven. I feared that I'd failed before I'd even really started. Even my tin wasn't right! I was supposed to use a shallow, square tin but a deep one would have to do.
I reluctantly placed the cake into the oven and prayed that it would rise. Well, the cake did rise, by about 1mm. Uh, oh! I did think about making the Genoese again but the same thing could happen the next time. There was no obvious pointer to show where I'd gone wrong. I'd possibly over mixed but with all the hidden butter and flour - it's hard not to! I have made Genoese a few times before and sometimes it has worked and sometimes it has failed. There seems to be no rhyme or reason to it!

Normally, I would have thrown this flat cake in the bin and comforted myself with a packet of biscuits but I couldn't give up. I carried on and made the coffee buttercream. This was also a tricky challenge as I had to make a sugar syrup. I wasn't really sure how hot to heat the sugar and water but guessed at around 105 degrees. I then had to add the red hot syrup to an egg yolk and whisk until it cooled down to room temperature. It turned out that the sugar syrup was too hot as it started to harden as I whisked. Thank goodness the egg yolk didn't scramble! I stubbornly kept whisking and managed to break up the small pieces of sugar. Once the mixture was smooth and cool, I added it to a bowl of super soft butter. I didn't have any coffee essence; instead, I risked adding coffee granules, which were dissolved in a little hot water. I feared I had made a mistake as the mixture quickly curdled. Nooo! I whisked until my arm ached and finally the buttercream came together and I was able to breathe a sigh of relief.
I knew I was fighting a losing battle but I still had to make the coffee icing. Thankfully, this was pretty straightforward. I had to clean the saucepan yet again so that I could melt the butter, milk and coffee granules together then add a heap of icing sugar. It smelt strongly of coffee and I felt tempted to eat it straight from the bowl!
Now, I was ready to slice the Genoese in half. Yes, I had to slice my pancake thin cake in half. How?! I started laughing at this point as hysteria had set in. Neil, my husband, ended up finishing the job as I was unable to cut it in an even, straight line. He had trouble rescuing it and the top piece was so thin you could see through it. Oh dear! The bottom layer looked stodgy. I was so very, very glad that Mary and Paul would not be tasting it. Thank goodness for small mercies!
I only seemed to have a tiny amount of the coffee buttercream. It had to be used to sandwich the cake back together and for decoration. This meant I had to be very sparing when spreading it over the bottom layer of the Genoese. The paper thin top layer of cake was soon back in place and I was ready to slice the cake into eight rectangular pieces. This was easy enough but it took a bit of elbow grease to saw through the stodgy cake! I brushed some warm apricot jam over the flat Genoese. I then turned my attention to the coffee icing. At least this had worked out well; it was far better than my previous attempt. Every cloud...!
I spooned the coffee icing over the cakes and spread it down the sides. It set quite quickly so I had to move fast to smooth it out with my palette knife. I had to pipe tiny rosettes of the remaining coffee buttercream onto each cake. I only had about a tablespoon of the buttercream left so this wasn't going to happen! In fact, I only had enough to complete just three of the cakes and a little token splodge of icing for the remaining five. If I had been in the tent, I'm not sure I'd have had the courage to present these to Mary and Paul. I think I may have hidden under my work bench with my fingers in my ears. I dread to think what they would have said!

The finished cakes tasted rather interesting! The Genoese was, of course, too heavy and dense. The coffee buttercream may have been sparse but it was absolutely delicious, as was the coffee icing. I really could have eaten them on their own. Who needs the cake, I'll just eat the icing!
So far, this challenge (and this series of Bake Off) are not inspiring me to try complex and skilled bakes. However, it is inspiring me to revisit simple recipes and try to do them really well. I have a real hankering to bake a lemon drizzle, or a tray of no-nonsense brownies!
Next week, it's the semi finals. The technical challenge is bound to be seriously difficult. I look forward to it with trepidation!
WEEK 9: Chocolate soufflé
It's hard to believe that the Bake Off semi-final is here already. The show started with 12 talented bakers and now we are left with just four. This week the remaining four will have to roll up their sleeves and tackle chocolate, eek! Chocolate is notoriously temperamental and fiddly to work with so it really will test the bakers to the limits. There is no room for error when there's a place in the final at stake. No pressure then!!

As much as I love chocolate I felt very nervous about this week’s technical challenge. My confidence had been dented with a run of bad luck. Everything I had baked seemed to go wrong. From last week’s Mokatines to a simple chocolate cake that I'd made for friends, it appeared that the 'baking gods' were against me!! This week’s technical is a chocolate soufflé and I wondered if it would help to lift my spirits or, more likely, leave me with a sinking feeling?!!
It was getting late by the time I started this recipe but on this occasion it didn't matter. Unlike most of the other challenges, there wouldn't be any need for me to stay up late to complete it. This was a no nonsense soufflé and there was no fancy decoration to worry about. This was my kind of recipe!
First of all, I broke up the plain chocolate and added it to a saucepan. There was some chocolate left over. Obviously I had to eat this. I think it's called quality control?! I added a little water and milk to the saucepan and heated it over a low heat until the chocolate melted. I poured quite a lot of milk into the melted mixture and then allowed it to come up to the boil. As I stood stirring the chocolaty mixture I enjoyed breathing in the intoxicating aroma. It occurred to me that I'd made a rather delicious hot chocolate. I felt tempted to pour it into a mug!

I took the saucepan from the heat and set it to one side while I got on with the next stage of the recipe. I needed another small saucepan so used the only one I had left. It was tiny! I set it over the heat and melted the small quantity of butter. I mixed in the flour and whisked the two ingredients together for a few minutes, just long enough to cook the flour. Now it felt as though I was making a white sauce!
Next it was time to add the hot chocolate to the butter and flour mixture. This was a bit tricky as my saucepan was so small. However, thankfully it just about fitted and I was able to give the chocolate sauce a vigorous whisk, before pouring the mixture back into the larger saucepan. There were a few lumps to start with but they melted away and I was left with a velvety thick sauce. It looked good enough to eat!
I was all ready to carry on and finish the soufflé, but it soon dawned on me that I would have to leave the sauce to cool down as it was still red hot. If I added the egg yolks to it they would curdle immediately. Instead, I turned on the oven and went into the living room to sit down with a cup of tea. I couldn't complain!
It took just over half an hour until the sauce was cool enough to add the egg yolks. The sauce had developed an unsightly skin but, after a flick of the whisk, normal service could be resumed. I carefully beat in the egg yolks, one at a time. The egg whites went into a mixing bowl to await their fate. It was nice to use a recipe where there would be no waste. I whisked the egg whites until they became stiff and held their shape. I stirred one spoonful of the egg white into the chocolaty sauce to loosen the mixture. Then, very carefully and slowly, I folded in the remaining whites. I folded and stirred at a snail’s pace as I was terrified of knocking the air out of the mixture! Finally the mixture was smooth and all the fluffy egg whites had combined. I gingerly poured the soufflé mixture into a greased oven proof dish.

I placed the dish into the oven and got down on my knees to watch it through the glass door. I prayed for my soufflé to show some sign of 'life'. Ten minutes passed and nothing happened. Neil, my husband, told me to move away. He reminded me that a watched pot never boils!! I reluctantly left my viewing post to retire to the sofa. After half an hour I could wait no longer. I sprung to my feet and went back to the oven. I peered through the grubby glass and, to my delight, I saw that my soufflé had reached the top of the dish. Hurrah! I left it in the oven for a further ten minutes and it managed to rise a little further. When I was ready to extract my soufflé from the oven, Neil had to be ready to capture it on camera as I knew it would deflate quickly.
Quick as a flash I took the soufflé from the oven, placed it on the worktop and added a dusting of icing sugar. I must admit that it didn't look very exciting. It was brown, which is all there really is to say about it! I dived in with my spoon and I was so pleased to see that the soufflé was cooked through. It was like a hot mousse; it looked so light. Although this dessert may not win any beauty contests, it wins on taste. It was unbelievably light and so chocolaty. It had worked - yippeeee! Neil loved this soufflé too, so much so that he ate over half of it. This was no mean feat as there was a lot of it!
This technical challenge was my kind of challenge. It was relatively quick to make, it required minimal attention and it tasted delicious. What more could anyone want?!

Maybe I have reclaimed my baking mojo - or will the final technical challenge have me quaking in my boots yet again!
WEEK 10: The final
My Bakealong experience
Nine weeks ago we eagerly watched twelve talented bakers enter the famous white tent for the very first time. From the comfort of our sofa we have witnessed them whip up elaborate masterpieces to impress the judges. Who can beat a wink from Mary or a rare handshake from Paul?! Along with the highs we have also shared their lows. We have seen the tears of frustration when cakes have sunk or a showstopper has collapsed. How can it be the final already? It's certainly been a memorable journey!
Attempting each of the technical challenges has given me an almost personal connection to the show. It made me feel part of it, despite baking in the comfort of my own home. I had the luxury of being able to collapse on the sofa with a cup of tea while my cakes were in the oven. I was able to chat with my family, while my husband was always on hand to remind me that, if it didn't work, it wasn't the end of the world! Of course, when in the kitchen, I often had my five and two year old boys running around under my feet but I think I'd rather endure that than be under the watchful eye of Mary and Paul!
When my bakes turned out well I felt on top of the world. There was such a sense of achievement when my Windtorte was successful. It was my first decent meringue and it also had me making my own fondant; I never thought I'd ever make my own! The baguettes were another enjoyable bake, as was the frosted walnut cake. They required enough skill to test me but gave worthwhile results. I felt that I had something attractive and delicious to show for all my effort. Unfortunately, just like the bakers, I also faced crushing disappointments! The Flaounas and gluten free pitta breads left me feeling stressed and worn out! Not only did they contain expensive speciality ingredients that were difficult to source, but the end results were substandard. When your bakes are left to go stale you know you've gone wrong! The Mokatines had me doubting my baking ability when my Genoise failed to rise. The tin I used was too large, my whisking inadequate and I was no doubt too heavy handed with the mixing. However, the finished result was edible and it's one I would like to attempt again. I hope I can make it work next time!
I was left confused by the 'tennis cake' despite finding Mary's Victorian fruit cake to be straightforward; the homemade decoration had me almost screaming with frustration! A royal icing tennis net proved beyond me and this challenge took me 24 hours to complete! In fact I never finished any of my bakes in the allotted time. It just goes to show the skill of the bakers as they always completed the technical challenges within the tight time limit - although they often looked broken as they sat to watch the judging!
After a few disappointments my confidence was bruised and I felt like hanging up my apron. It wasn't worth it when I wasn't enjoying it. Thankfully I saw sense as I realised that I was simply yearning for my favourites such as lemon drizzle, traybakes, and a no fuss Victoria sandwich. Simple? Yes, just the way I like it!!
6 things I’ve learnt from baking GBBO’s technical challenges
Never again! Ok, so maybe not never again but it was one epic challenge which I will certainly not be repeating any time soon. I really don’t know how the bakers manage to make some of the bakes in the amount of time that they have. Mind-boggling!
Use the right tools for the job Having the right size tin can be the difference between a perfectly risen and cooked cake and an underbaked and stodgy disaster. It's so important to check that you are using the correct size and depth tin to avoid any disappointment! Add a nozzle to your piping bag to be sure of perfect piping. It will look so much neater. A balloon whisk is all very well and good but you really need an electric whisk to be sure of a voluminous meringue or a light sponge.
No harm in trying It's easy to underestimate our own ability but we can often achieve more than we might think we can. It's always fun to test out new skills. It needn't be anything challenging, just a new recipe will do. Yes, some things may not work but it's such a thrill when they do. You may just surprise yourself!
One step at a time It's easy to feel daunted when faced with a new or lengthy recipe. However, if we break it down into small sections, it won't feel so overwhelming.
Don't give up Bake what makes you happy. If simple cakes and bakes are your thing then practise perfection. If you prefer creating a jaw dropping masterpiece then keep on making showstoppers. Baking should be fun and made with love.
The bakers are AMAZING!! Those bakers sure know how to bake. They have proved their baking ability week after week and also shown nerves of steel as they contended with Mary, Paul, tricky challenges and the tight time limits. Bakers, I salute you!
